User guide · v1.0.0
Organize your Media Library into folders
Content Explorer adds a drag-and-drop folder tree to the WordPress Media Library - no code required. This guide walks through the everyday basics first, then each Pro feature in turn. Sections marked Pro need Content Explorer Pro.
Step 1
Getting started
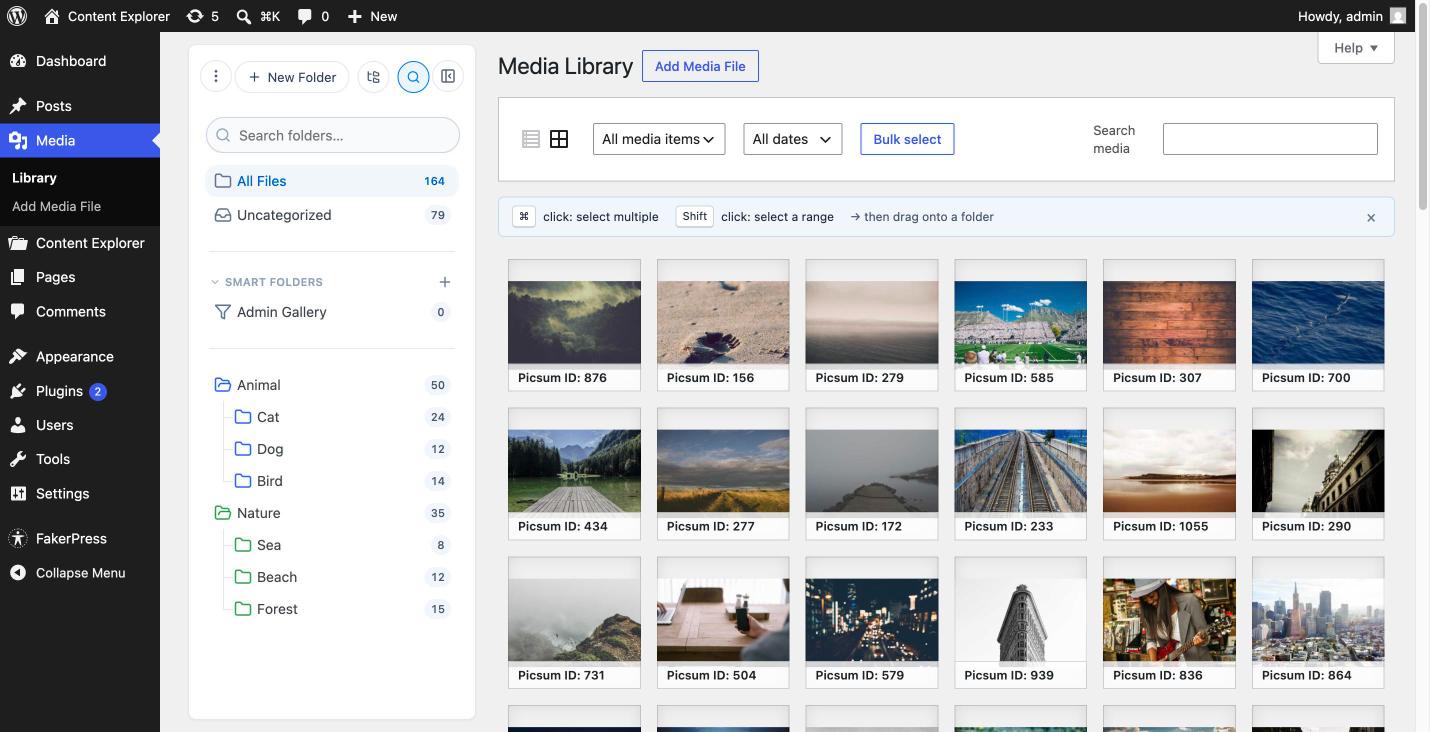
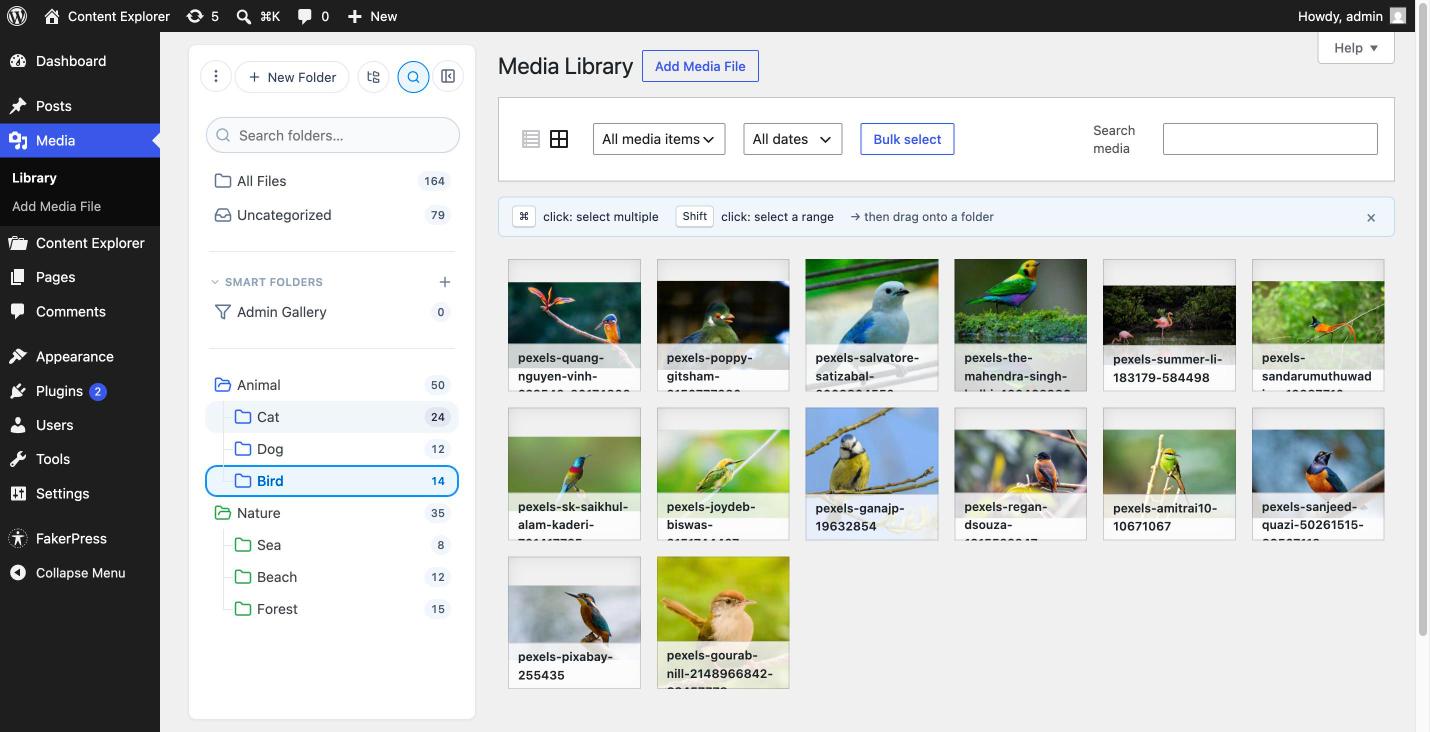
Once the plugin is active, open Media → Library. A folder sidebar now sits on the left of the grid - this is where you create folders and click to filter your files.
- Go to Media → Library and switch to grid view if you are not already there.
- The sidebar shows All files and Uncategorized at the top, with your folder tree below. The same sidebar also appears in the media picker when you insert an image while editing a post or page.
- Hide/show the sidebar with its toggle button, and drag its right or bottom edge to resize it. Your width and collapsed state are remembered.
Who can use it?
Anyone who can already upload media (the upload_files capability) sees and uses the folder sidebar. Plugin settings are limited to administrators.
Step 2
Create & organize folders
Build a tree that matches how you think about your media - by project, by client, by month, however you like.
- Click New Folder (or right-click empty space in the sidebar) and type a name.
- Nest a folder by dragging it onto another; reorder siblings by dragging them up or down.
- Right-click any folder for its menu: New Folder, Rename, Cut, Paste, Delete, and Change Color.
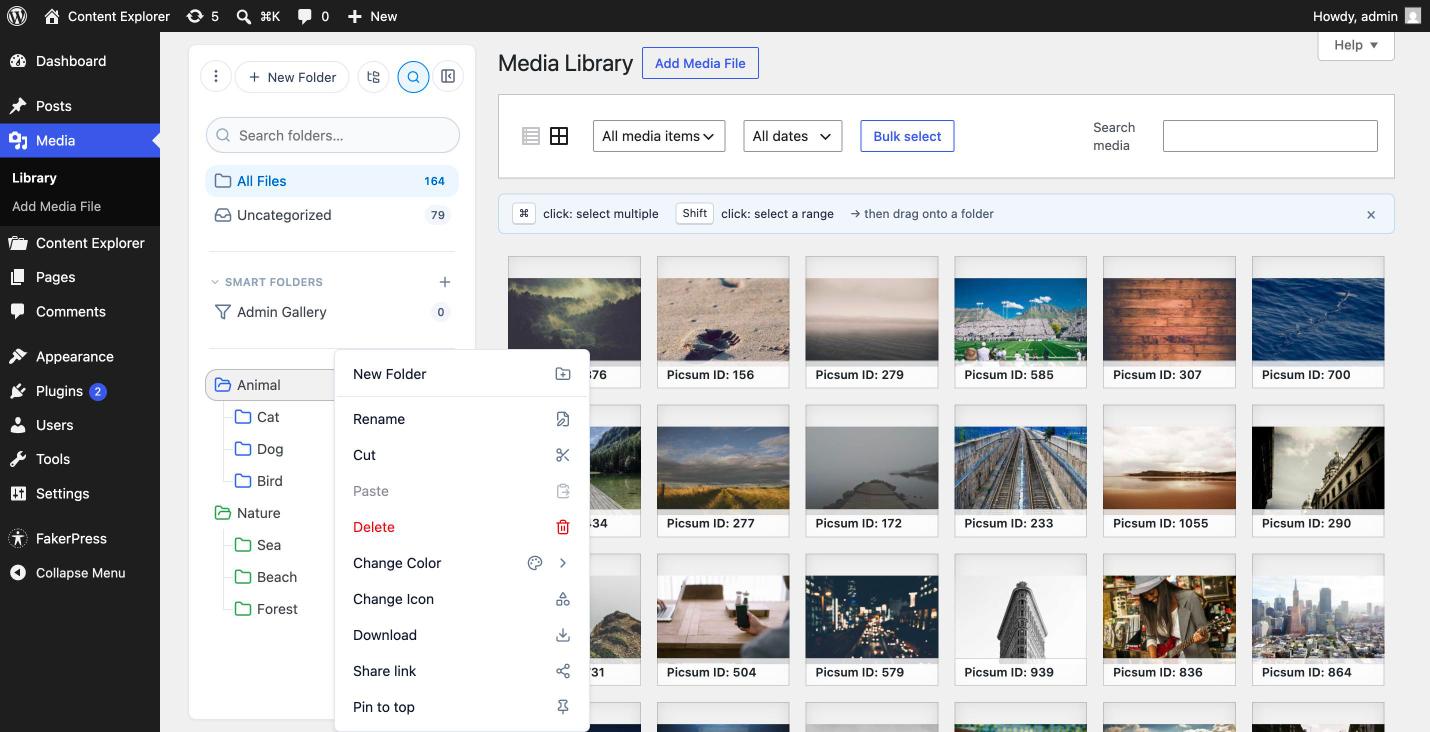
Every one of these has a keyboard equivalent. See Keyboard & mouse shortcuts.
| Action | How | Notes |
|---|---|---|
| Rename | Right-click → Rename, press F2, or click an already-selected folder a second time. | The name turns into a text box in place. Enter saves, Esc cancels. |
| Color | Right-click → Change Color, pick a swatch. | A colored dot makes a folder easy to spot. Free feature. |
| Move / nest | Drag a folder onto another, or Cut then Paste. | Paste is disabled onto the folder itself or its own children. |
| Delete | Right-click → Delete. | Removes the folder only - your media files are never deleted. |
Deleting a folder keeps your files
Deleting a folder only removes the folder and unfiles the media inside it (the files move to Uncategorized). The attachments themselves stay in your Media Library.
Step 3
Find & filter files
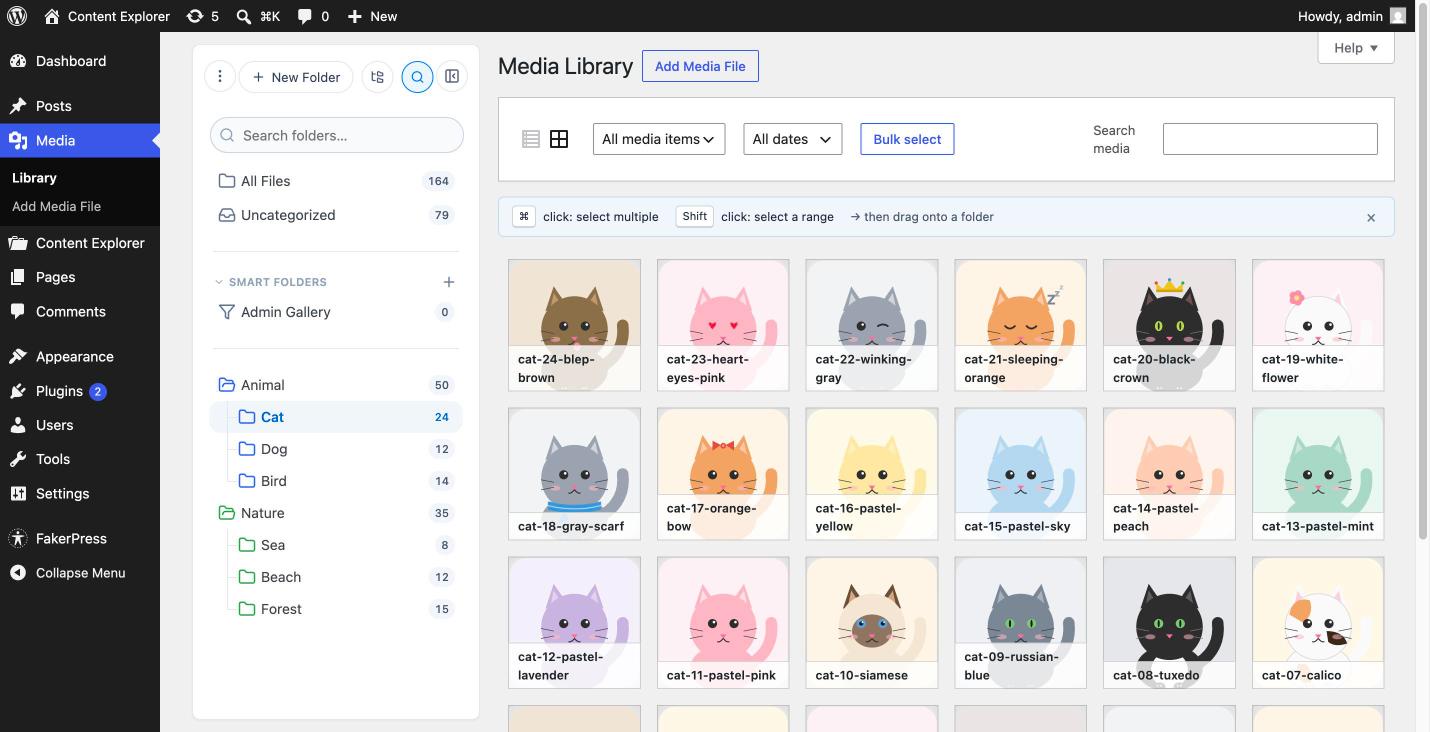
Click a folder in the sidebar and the Media Library instantly filters to show only that folder’s files. The count next to each folder tells you how many files it holds.
- All files - everything in your library, the default view.
- Uncategorized - files that aren’t in any folder yet.
- A folder - just that folder’s files. WordPress’s own search and type/date filters still apply on top. Turn on Include subfolders in counts in Settings to make a folder show everything in its subfolders too.
Step 4
Move files into folders
Filing media is drag-and-drop. By default a file lives in exactly one folder, so dragging moves it.
- In the grid, drag a thumbnail onto a folder in the sidebar. The target folder highlights as you hover it.
- To move several at once, ⌘/Ctrl-click (or Shift-click for a range) to select multiple files first, then drag any one of them.
- Let go. A toast confirms “Moved N items” and the files appear in that folder.
Removing files from folders
Drag a file onto Uncategorized to take it out of its folder. With Multiple folders per file (Pro) on, dragging adds instead of moving.
Step 5
Keyboard & mouse shortcuts
The folder sidebar is fully usable from the keyboard. Once a folder has the keyboard cursor you can move through the whole tree, open and close folders, and rename, cut, paste or delete without reaching for the mouse. These are core features: they work the same in Free and Pro.
Rename a folder, three ways
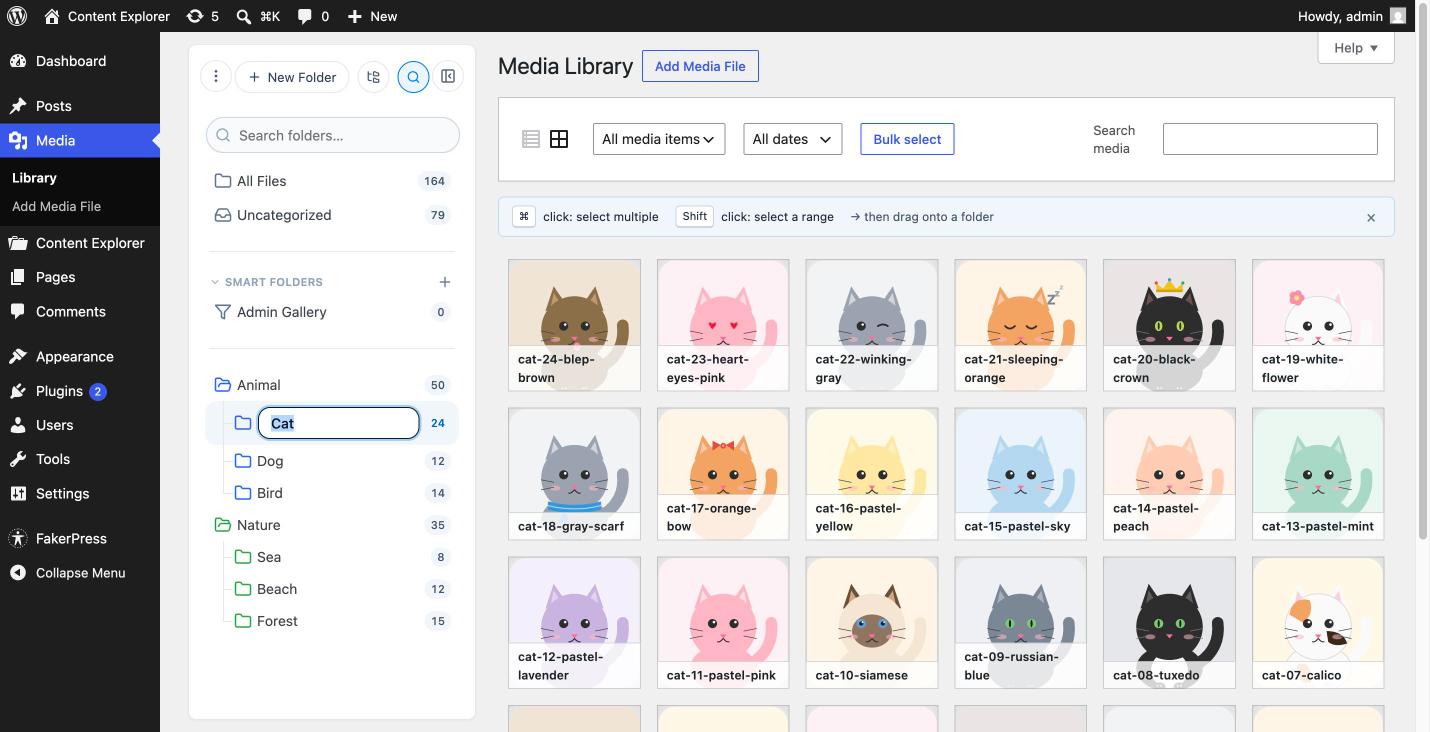
- Click again. Click a folder to select it, then click it a second time as a slow, separate click (not a double-click). The name turns into a text box, the way renaming works in Finder and File Explorer.
- Press F2 with a folder selected to jump straight into the name box.
- Right-click → Rename from the folder’s menu.
Enter (or clicking away) saves; Esc cancels. Renaming to an empty or unchanged name does nothing. The same inline box appears when you create a folder, with the name preselected so you can type straight over it.
Moving around
Click any folder once, or press Tab until the sidebar is highlighted, to put the cursor on a folder. As the cursor moves, the highlighted folder is selected, so the library filters to it exactly as clicking would.
| Key | What it does |
|---|---|
| ↑ / ↓ | Move to the previous / next folder. |
| → | Open a closed folder; press again to step into its first subfolder. |
| ← | Close an open folder; otherwise jump up to its parent. |
| Home / End | Jump to the first / last folder in the list. |
| Type a name | Jump to the next folder whose name starts with what you type. |
Folder actions
| Key | Action |
|---|---|
| Enter or Space | Open / close the folder. |
| F2 | Rename the folder. |
| ⌘X / Ctrl+X | Cut the folder. |
| ⌘V / Ctrl+V | Paste the cut folder inside this one. |
| Delete | Delete the folder (asks you to confirm first). |
| ⌘⌫ / Ctrl+⌫ | Delete the folder (the Mac "move to trash" shortcut). |
| Esc | Cancel an in-progress rename or new folder. |
Nothing is destructive by accident
- Plain Backspace does not delete. Only the Delete key or ⌘⌫ does, and both open a confirmation first.
- Typing a letter jumps to a matching folder; it never starts a new one. There is no ⌘N shortcut, because browsers reserve it for a new window. Use New Folder or right-click → New Folder.
- All files, Uncategorized and the Pinned / Smart folder groups are reachable with Tab. Pinned rows support click-again renaming and F2 as well.
Who can reshape the tree
Creating, renaming, moving, deleting and reordering folders needs the Edit categories permission, which Editors and Administrators have by default. Authors and Contributors can still browse the tree, filter the library, and file their own uploads; the actions that would change the shared tree simply do not appear for them.
Step 6
Manage folders in bulk
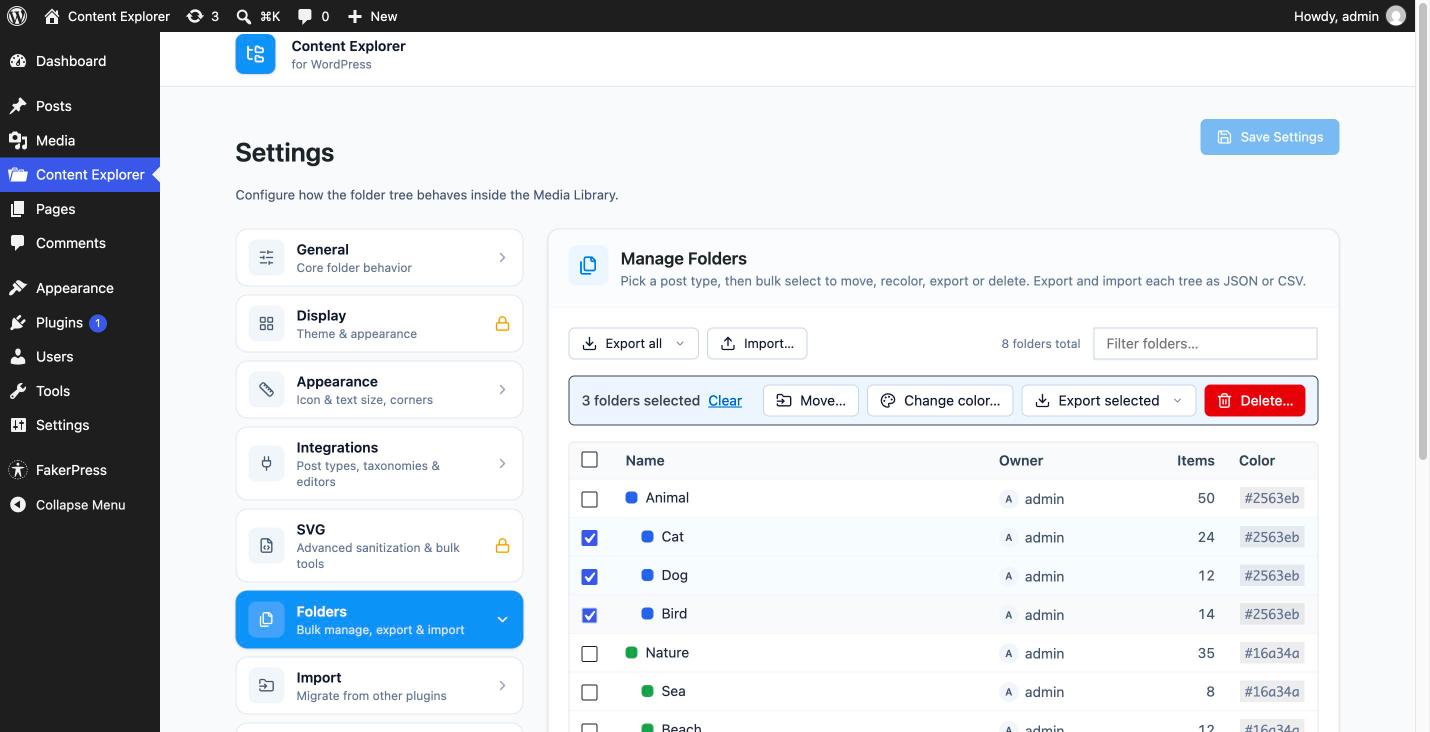
The Folders tab in Settings is a flat table of every folder on the site, built for cleaning up or reorganizing at scale rather than one folder at a time. Pick a post type at the top to switch between the media tree and any content tree.
| Column | Shows |
|---|---|
| Checkbox | Per row, plus a select-all in the header. |
| Name | Indented to reflect how deep the folder sits. |
| Owner | Who created the folder. Blank for folders seeded by WP-CLI or whose user was deleted. |
| Items | Live file count. |
| Color | The folder’s color swatch, if one is set. |
Tick any row and the action bar appears:
- Move - reparent the whole selection under one folder, or to the top level. Moves that would create a loop are rejected.
- Recolor - apply one palette color, or clear the color, across the selection.
- Delete - requires typing
DELETEto confirm. Each selected folder goes with its subfolders; the files inside are unfiled, never deleted.
Pro: export and import the tree
Pro Export all or Export selected writes the tree out as JSON (nested structure with names, colors and children) or CSV (one row per folder with a slash-delimited path, ready for Excel). Exporting a selection brings its subfolders along, so a subtree is portable on its own. Import… reads either format back, reusing existing folders along a path instead of duplicating them.
This is for moving a Content Explorer tree between sites. To pull a tree out of a different plugin, use Migrate from another plugin instead, which is free.
Step 7
Migrate from another plugin
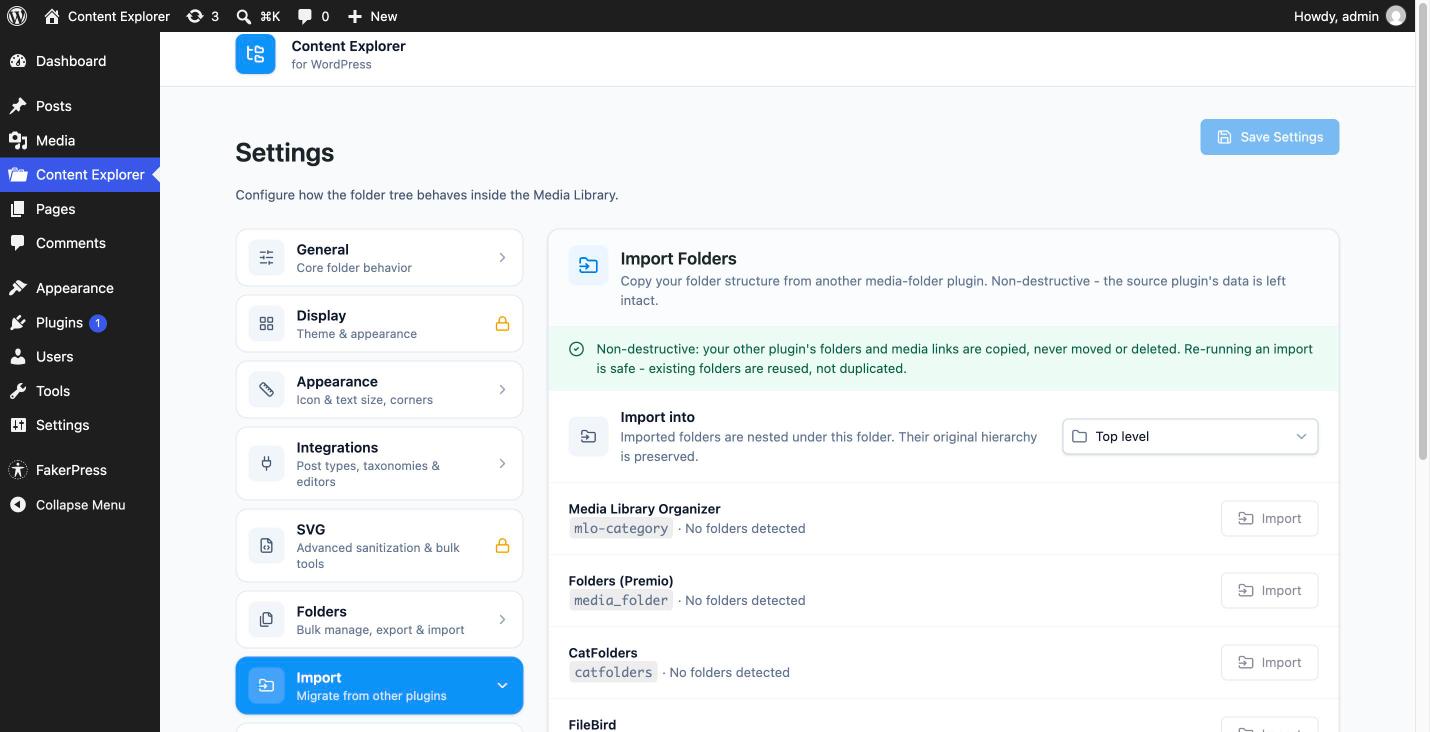
Already organized your library with another folder plugin? The Import tab reads that plugin’s folder tree and recreates it here, with your media filed into the matching folders. It is free, non-destructive, and safe to run twice.
- Open Content Explorer → Settings → Import. Each plugin it can read is listed with the number of folders and files it found.
- Choose a destination: import at the top level, or nest the whole imported tree under a folder you already have.
- Click Import next to a source. The summary reports how many folders were created, how many existing ones were reused, and how many files were filed.
| Plugin it can read | Notes |
|---|---|
| FileBird | Folders and file assignments. |
| CatFolders | Media folders only; its post and page entries are skipped. |
| Real Media Library | Full hierarchy, including its root-level folders. |
| Folders (Premio) | Reads its media_folder taxonomy. |
| Media Library Organizer | Reads its mlo-category taxonomy. |
Nothing is taken away from the old plugin
The import only reads the other plugin’s data: its folders, terms and assignments are left exactly as they were, so you can switch back or run both side by side while you check the result. A source still shows up even if its plugin is deactivated, because the data is in the database either way. Re-running an import reuses folders it already created instead of duplicating them.
One-click import on a fresh install
On a brand-new install with no folders yet, if another plugin’s data is detected the empty sidebar shows an Import from old plugin button that does the whole thing in one click. It disappears as soon as you have folders of your own.
Step 8
Settings
Open Content Explorer in the wp-admin sidebar for the settings screen. It is organized into tabs down the left; the Pro-only ones stay visible with a lock until a license is active. Changing settings needs administrator access, while the folder sidebar itself is available to anyone who can upload files.
| Tab | What lives there |
|---|---|
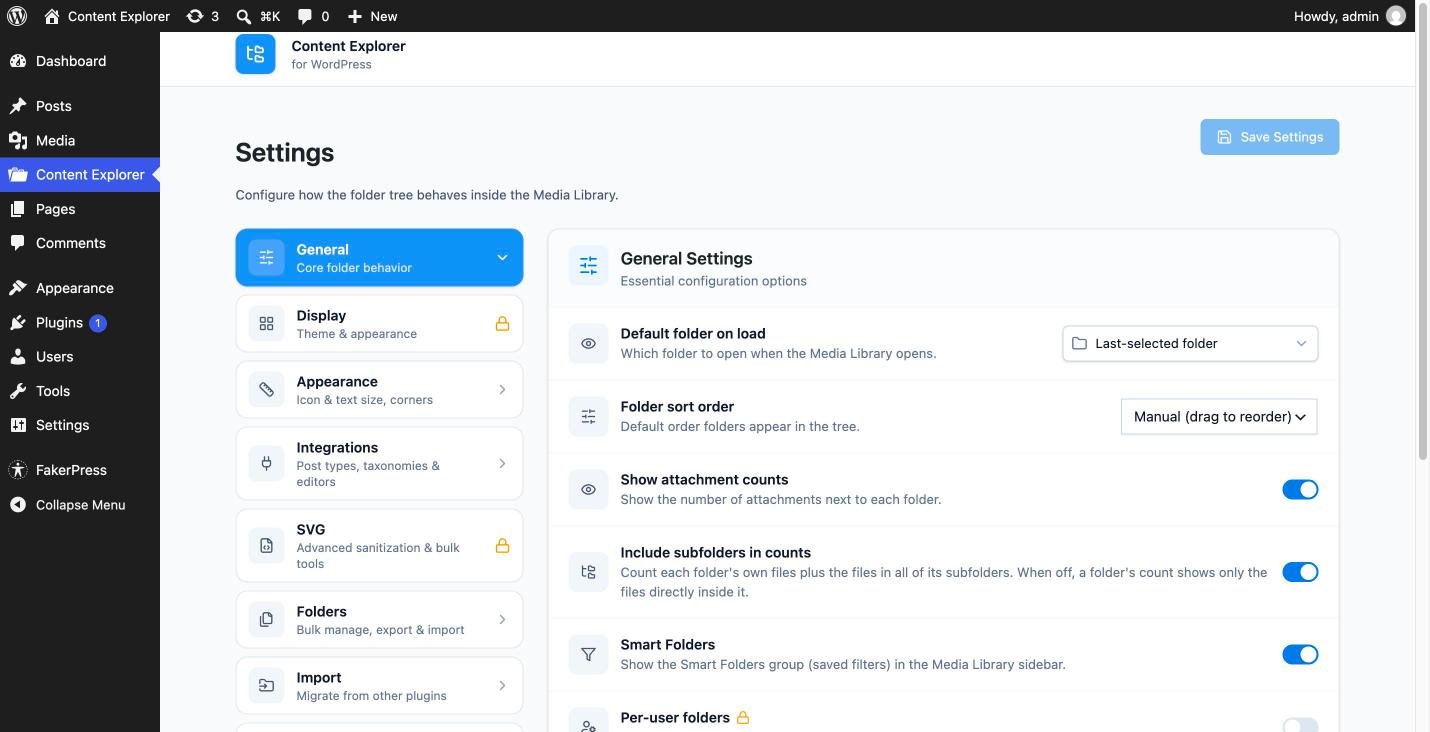
| General | Default folder on load, folder sort order, counts, and the switches for Smart Folders, Per-user folders, Multiple folders per file and SVG uploads. |
| Display (Pro) | The visual theme for the folder sidebar. See Themes & appearance below. |
| Appearance | Folder icon and text size, plus the corner radius shared by the search box, buttons, row hover and the sidebar box. Free. |
| Integrations | Which post types get a folder tree (and a smart-folder group), and which post types or taxonomy screens to leave the sidebar out of. |
| SVG (Pro) | Trusted mode, extra allowed tags and attributes, and the bulk re-sanitize tool. |
| Folders | The bulk Manage Folders table, with Pro export and import. |
| Import | Migrate a folder tree in from another plugin. Free. |
| Downloads (Pro) | How folder ZIPs are built: default mode, size caps, whether thumbnails are included, link lifetime, email on completion. |
| Shared links (Pro) | Every public share link you have made, with its status, download count, and Revoke / Delete. |
| Backups (Pro) | Snapshots of your folder organization, and restore. |
| License | Activate the site, see the plan, release the seat. |
| Danger Zone | Reset all folders and settings. |
The General tab in detail
| Setting | What it does |
|---|---|
| Default folder on load | Which folder is selected when the library opens: None, the last folder you used, or one specific folder. |
| Folder sort order | Manual (drag to reorder), Name A→Z, or Name Z→A. Switching to a name order keeps your manual order stored, so going back to Manual restores it. |
| Show attachment counts | Show the file count badge next to each folder. |
| Include subfolders in counts | Off by default, so a folder counts only its own files and clicking it shows only those. On, a folder counts its own files plus everything in its subfolders, and clicking it lists the whole subtree. |
| Smart Folders (Pro) | Show the Smart Folders group in the sidebar. |
| Per-user folders (Pro) | Each non-admin user sees only the folders and uploads they created. |
| Multiple folders per file (Pro) | Let one file belong to several folders at once. |
| Allow SVG uploads | Accept .svg files, sanitizing every one before it is stored. Free. |
Quick Settings, without leaving the library
The settings button at the top of the folder sidebar opens a Quick Settings panel with the same default folder, sort order, counts and theme controls, so the common tweaks never need a trip to the settings screen.
Danger zone: reset all data
The Danger Zone tab has a reset action that deletes every folder and the plugin’s settings. It makes you type a confirmation phrase first, and, like everything else here, it never deletes your actual media files.
Free + Pro
SVG support
WordPress blocks SVG uploads by default because an SVG can contain scripts. Content Explorer lets you turn SVG uploads on cleans every file automatically, so you get scalable logos and icons without the security risk. Safe upload is free; advanced controls are Pro.
- Go to Settings → General and switch on Allow SVG uploads. (Off by default.)
- Upload
.svg/.svgzfiles like any other image. Each one is sanitized as it uploads - scripts, event handlers, and remote references are stripped. - If a file can’t be made safe, the upload is rejected and nothing is stored.
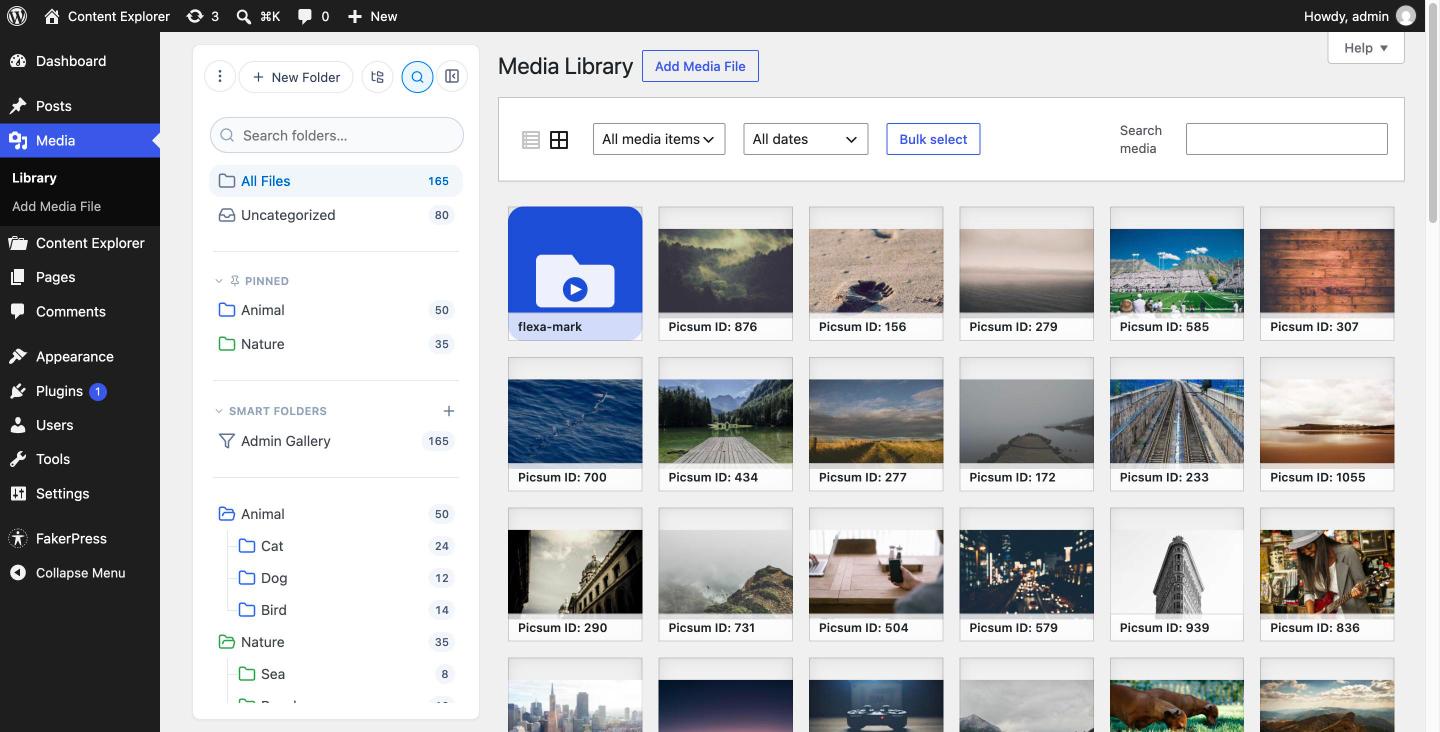
Uploaded SVGs render their actual artwork (not a generic file icon) everywhere images appear - the grid, the media picker, featured images, your theme, and the Folder Gallery block.
Pro: advanced SVG tools
A Pro SVG settings tab adds a trusted mode (store SVGs without cleaning - use only if every uploader is fully trusted), extra allowed tags/attributes, and a one-click Re-sanitize all SVGs tool that cleans your whole library in batches. Without Pro, every SVG is always sanitized, no matter what is stored.
Pro feature
Smart Folders
A smart folder is a saved filter, not a real folder. Give it a rule - like “all SVGs”, “PDFs uploaded by me”, “all drafts tagged news”, or “posts published this month” - and it automatically collects every matching item. Works in the Media Library, Posts, Pages, and any custom post type you’ve opted into folders. Pro
- Turn it on at Settings → General → Smart Folders. A Smart Folders section appears above your normal folders in the sidebar - on the Media Library and on every CPT list screen (Posts, Pages, Products, …).
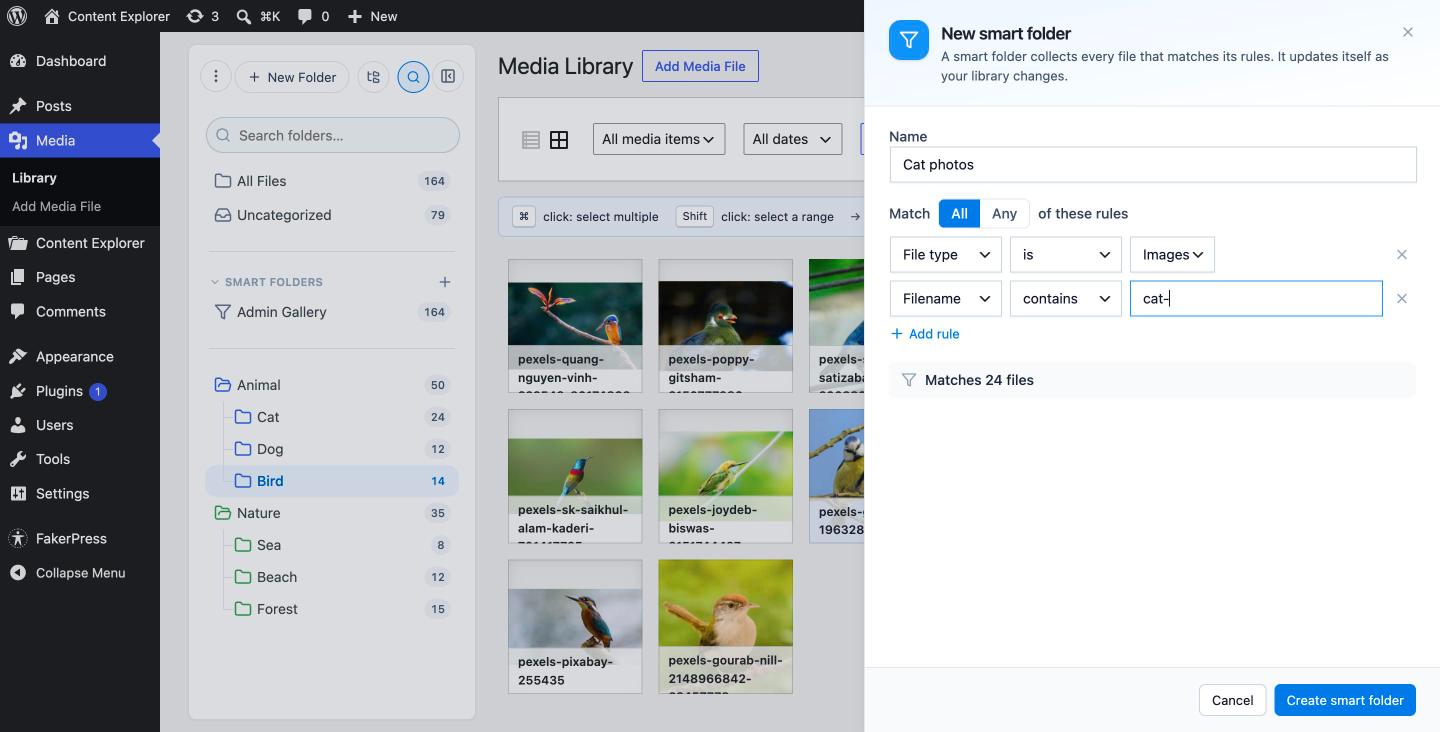
- Click the + next to the Smart Folders heading on the tree you’re currently in. Give it a Name, pick Match: All (AND) or Any (OR), and add one or more rules.
- Each rule has a Field, an operator, and a value. The available fields depend on the tree: Media Library: File type, Author, Filename; Posts / Pages / CPT: Author, Taxonomy (taxonomy + term picker), Date (before / after / between). A live “Matches N” count updates as you edit.
- Click Create smart folder. Click it in the sidebar any time to filter the current list to its matches. A Post smart folder lives only in the Post tree; a Page smart folder only in the Page tree, etc.
Good to know
- You can’t drag items into a smart folder - membership is decided by the rule.
- Rules combine via the Match: All / Any toggle at the top of the rule list (AND vs. OR).
- Each smart folder is locked to one post type. To use the same logic in another tree, create a second smart folder there.
- Download and Share link only appear on file smart folders - they ZIP files, not posts. For Post / Page / CPT smart folders, use the developer endpoint
GET /smart-folders/{id}/objectsto render the matched posts on the front end. - Deleting a smart folder removes only the saved filter, never your media or posts.
Pro feature
Multiple folders per file
Normally a file lives in one folder. Turn this on and a file can belong to several folders at once - dragging adds it without removing it from the others, like tagging. One copy of the file, many folders. Pro
- Switch on Settings → General → Multiple folders per file.
- Drag a file onto a folder - a toast confirms “Added N items” and the file stays in any folder it was already in. (Dropping on Uncategorized still removes from all.)
- Open a file’s details and use the folder checklist: tick to add, untick to remove. Sidebar counts update immediately.
- While viewing a folder, select files and click Remove from “{folder}” to take them out of just that folder.
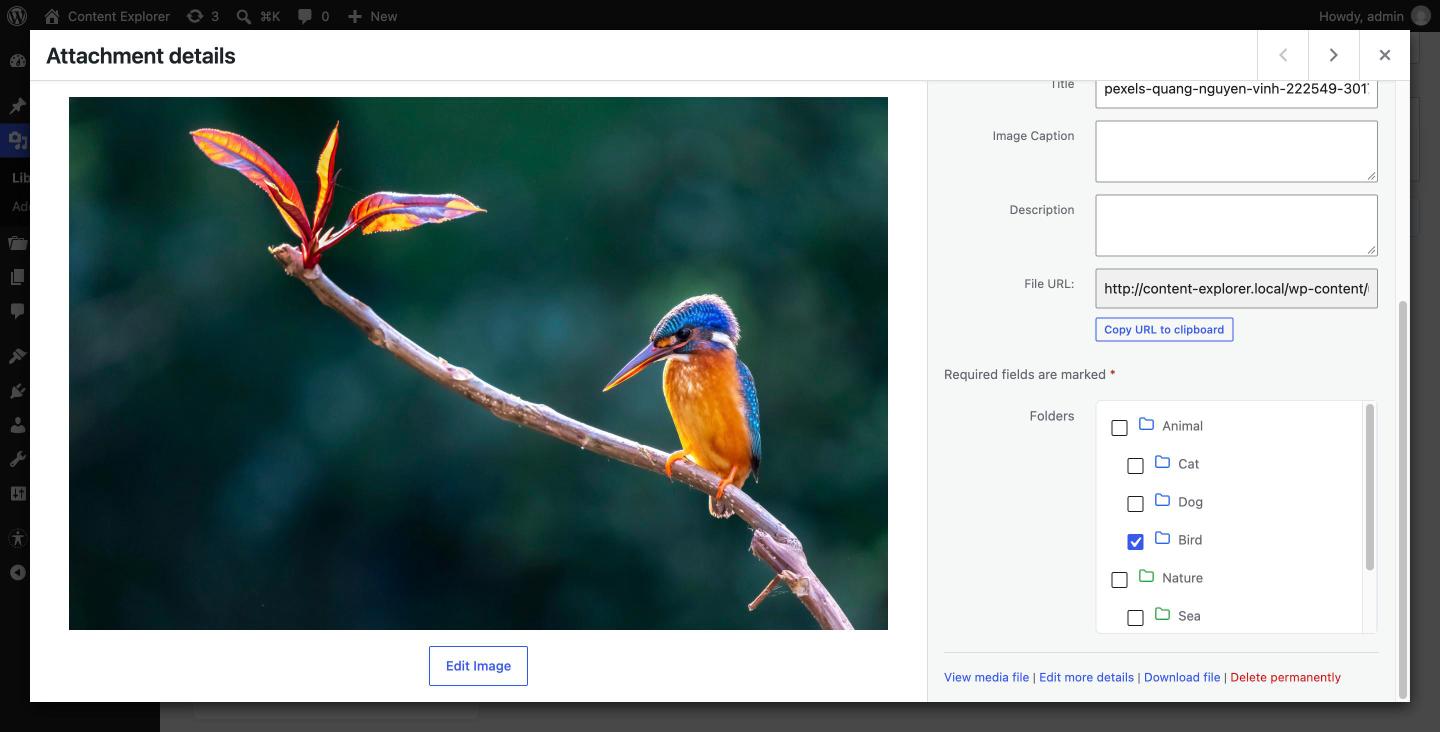
Counts can total more than your library
With multi-folder on, the same file is counted in every folder it belongs to, so per-folder counts can add up to more than the number of files you have. That’s expected. Switching the mode off is safe - existing memberships are kept.
Pro feature
Pinned (favorite) folders
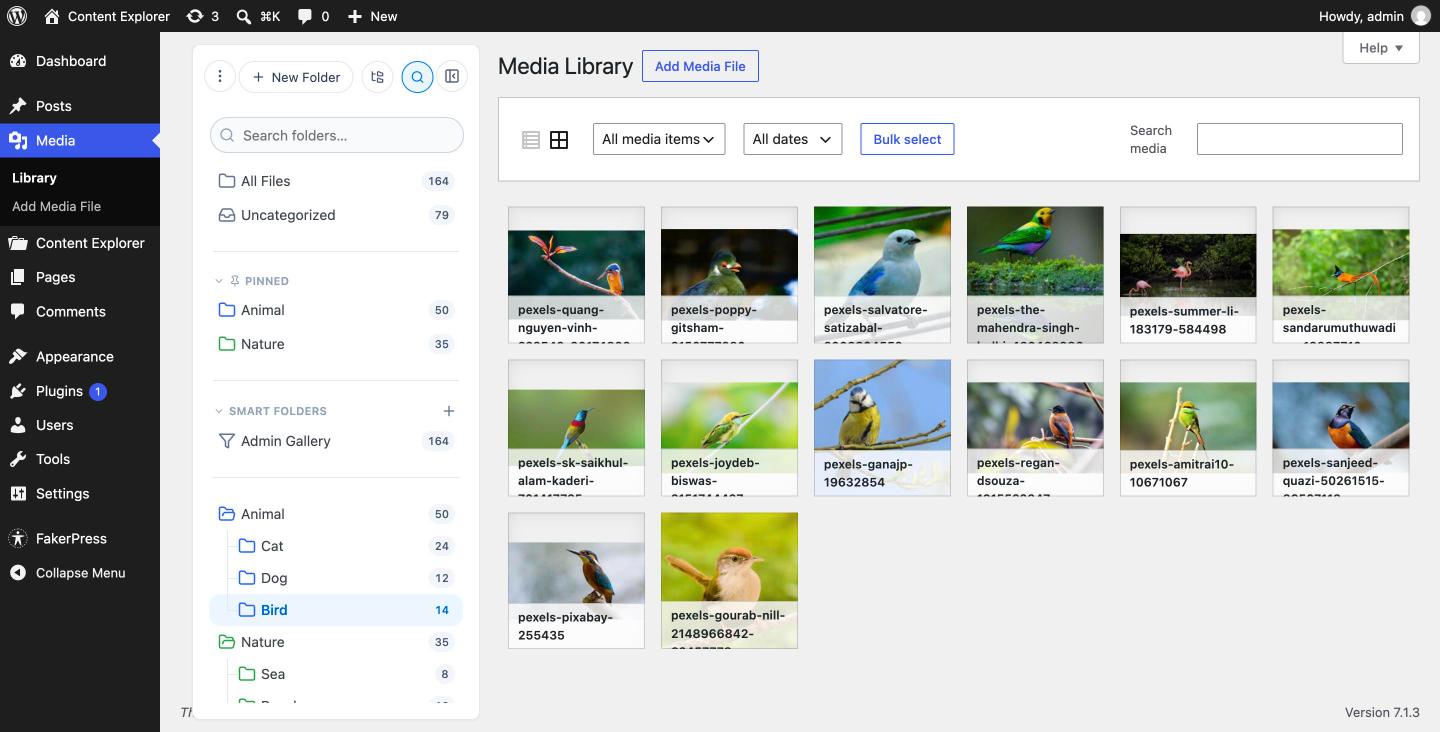
Keep the folders you open most at your fingertips. Pin a folder and it jumps to a Pinned group at the very top of the sidebar - one click away no matter how deep it lives in the tree. Pins are saved per user, so your shortcuts are yours alone. Pro
- Right-click a folder in the sidebar and choose Pin to top.
- It appears in the Pinned group above your folder tree. Clicking a pinned row filters the library to that same folder.
- To remove a shortcut, right-click the pinned folder and choose Unpin. The folder itself is untouched - only your shortcut goes away.
A pin is just a shortcut
Pinning never moves or copies a folder - it’s an alias to the real one. Because pins are stored against your own user account, each teammate curates their own favorites without affecting anyone else’s sidebar.
Pro feature
Per-user folders
On a site with several contributors, give each person their own private corner of the library. With per-user folders on, everyone except administrators sees only the folders they created and only their own uploads. Pro
- Switch on Settings → General → Per-user folders.
- Each non-admin user now sees a sidebar containing just their own folders. Other people’s folders are invisible everywhere: the tree, the media modal, the Manage Folders table.
- Uncategorized changes meaning slightly: it now means “my uploads that are not in any of my folders”.
Administrators always see everything
Anyone who can manage options keeps the full view, which is what makes cleanup, audits and support possible. Turning the setting back off is safe: nothing is moved or deleted, everyone simply sees the whole tree again.
Free + Pro
Themes & appearance
Two tabs shape how the sidebar looks. Appearance is free and controls sizing; Display is Pro and swaps the whole palette.
Appearance (free)
Settings → Appearance tunes the sidebar to your taste: folder icon size and folder text size for a denser or roomier tree, and four corner-radius controls (search box, buttons, row hover, and the sidebar box itself) for anything from fully square to pill shaped.
Display themes Pro
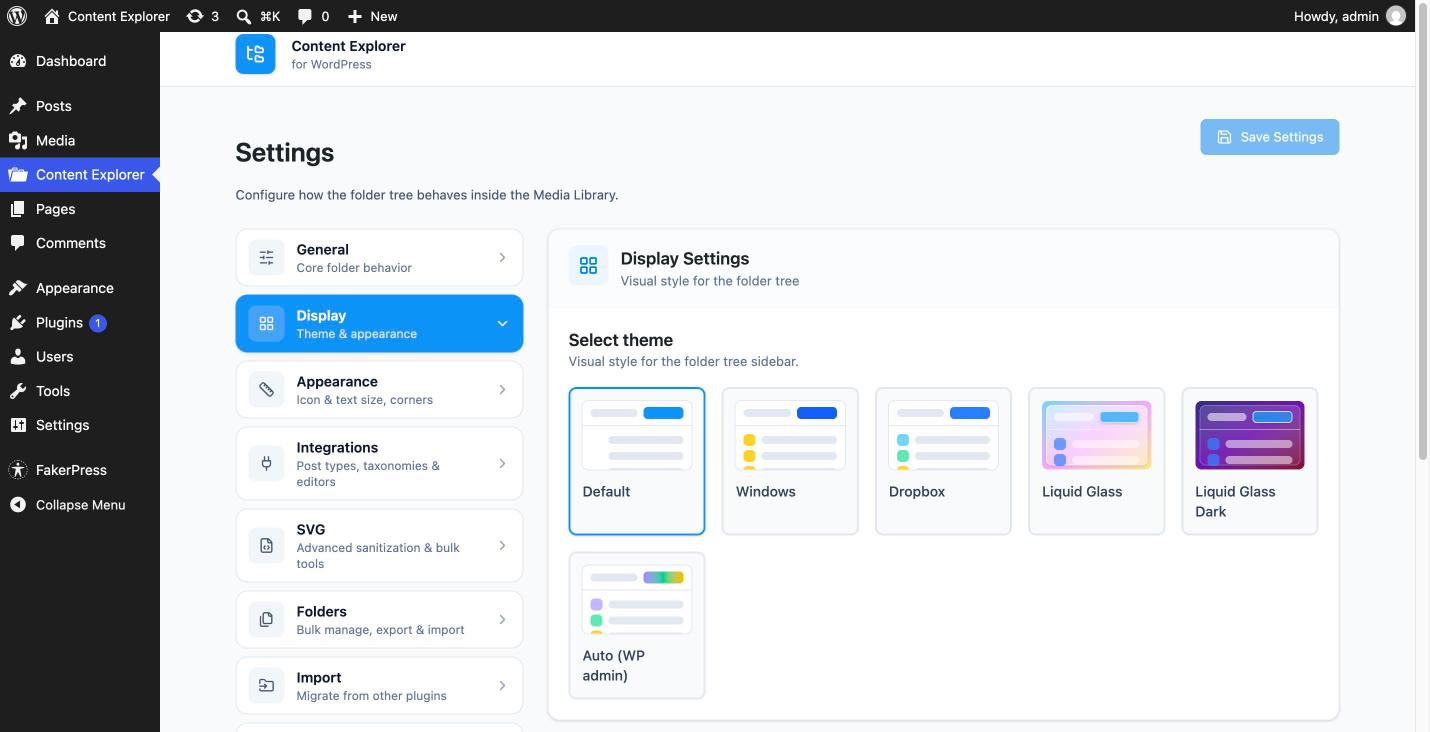
Settings → Display picks the sidebar’s visual style. Each card shows a live preview tile, so you can see the difference before saving.
| Theme | Looks like |
|---|---|
| Default | The plugin’s own palette. |
| Windows | Explorer-style amber folders. |
| Dropbox | Cooler sky and emerald tones. |
| Liquid Glass | Soft translucent panels, light. |
| Liquid Glass Dark | The same treatment on a dark canvas. |
| Auto (WP admin) | Follow whichever WordPress admin color scheme you are using. |
Dark mode comes for free
The sidebar follows your WordPress admin color scheme on its own: pick Midnight, Ectoplasm, Ocean or Coffee in your profile and the folder tree switches to its dark palette. That happens whichever theme you pick, in Free as well as Pro, and the two settings compose.
Pro feature
Download a folder as a ZIP
Hand a whole folder to someone in one file. Right-click a folder → Download packages its files into a ZIP, keeping the subfolder structure inside the archive. Pro
- Right-click a folder in the sidebar and choose Download.
- Confirm what to include. Small folders stream straight to your browser; bigger ones are built in the background so nothing times out.
- Background builds show a progress tray in the bottom-right corner. When it finishes, the tray offers the download link.
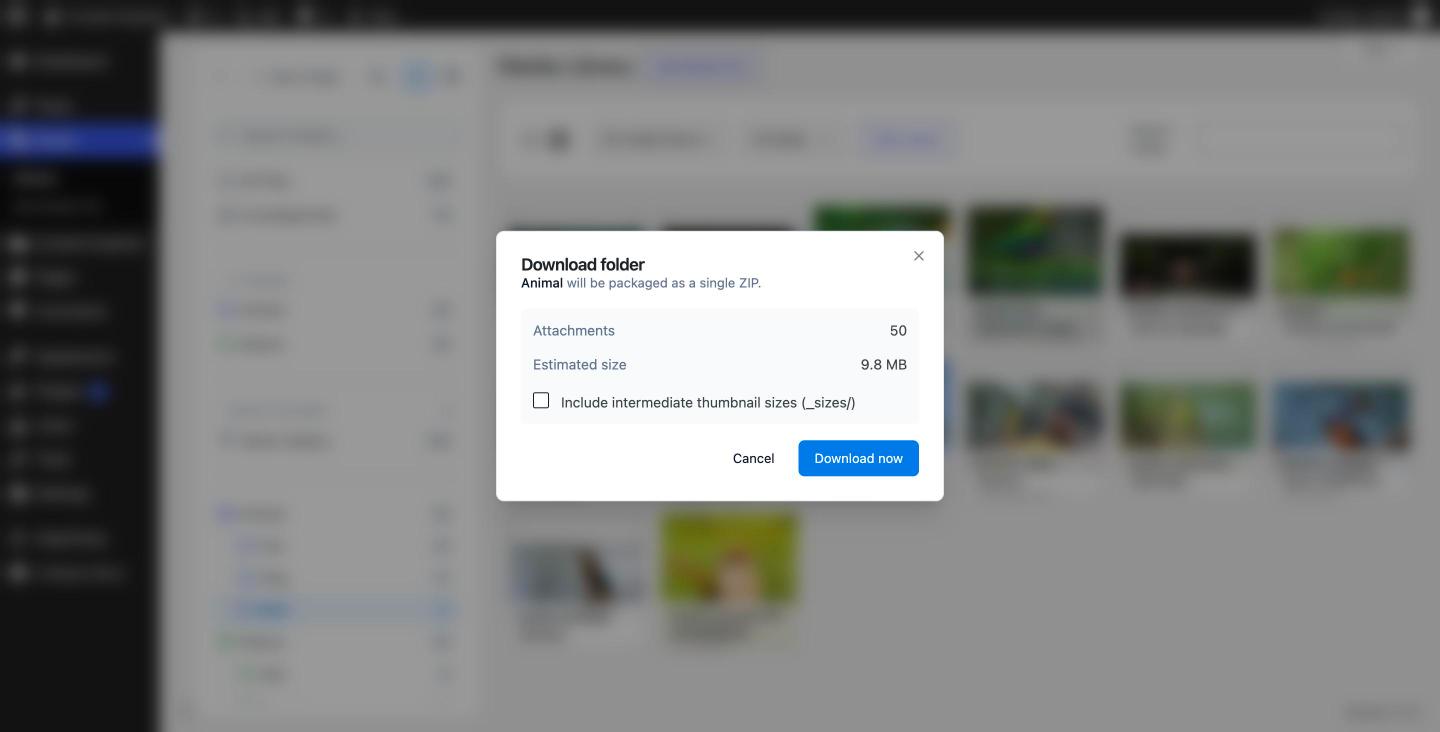
Two files with the same name in the same folder are kept apart in the archive as photo.jpg and photo (2).jpg, so nothing is silently overwritten.
Downloads settings
Settings → Downloads controls the defaults: how big a folder has to be before it goes to a background job, the maximum number of files per ZIP, whether WordPress’s generated thumbnail sizes are included alongside the originals, how long a finished download link stays valid, and whether you get an email when a background ZIP is ready.
Needs ZipArchive
Building archives uses PHP’s ZipArchive extension, which nearly every host enables. If it is missing the plugin says so plainly instead of producing a broken file; ask your host to enable it.
Pro feature
Share links
A share link turns a folder into a public download URL. Send it to a client and they download the whole folder as a ZIP - no login needed. You control expiry, password, and can revoke any time. Pro
- Right-click a folder and choose Share link.
- Set an optional Label, an Expiry (1 / 7 / 30 days or Never), and an optional Password.
- Click Create link and use the Copy button to grab the URL.
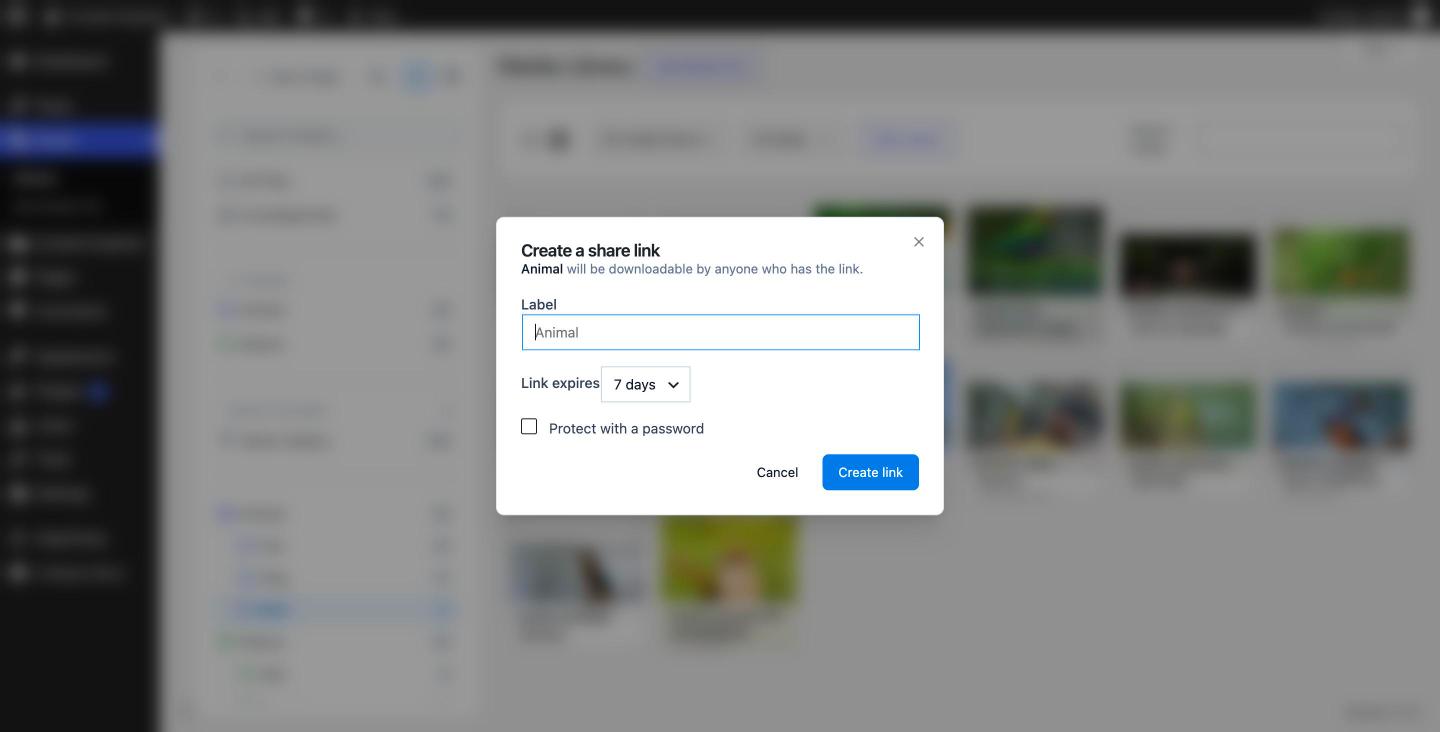
Recipients see a clean, branded download page (not your theme, not wp-admin). The ZIP is built on first open and cached; if you change the folder’s contents it rebuilds automatically next time. Manage every link you’ve made under Settings → Shared links (status, downloads, revoke, delete).
Security & privacy
The link contains a long random code that can’t be guessed. Revoking or expiring it blocks downloads immediately. A password protects the file even if the link is forwarded, and recipients can only download the one folder you shared.
Pro feature
Folder Gallery block
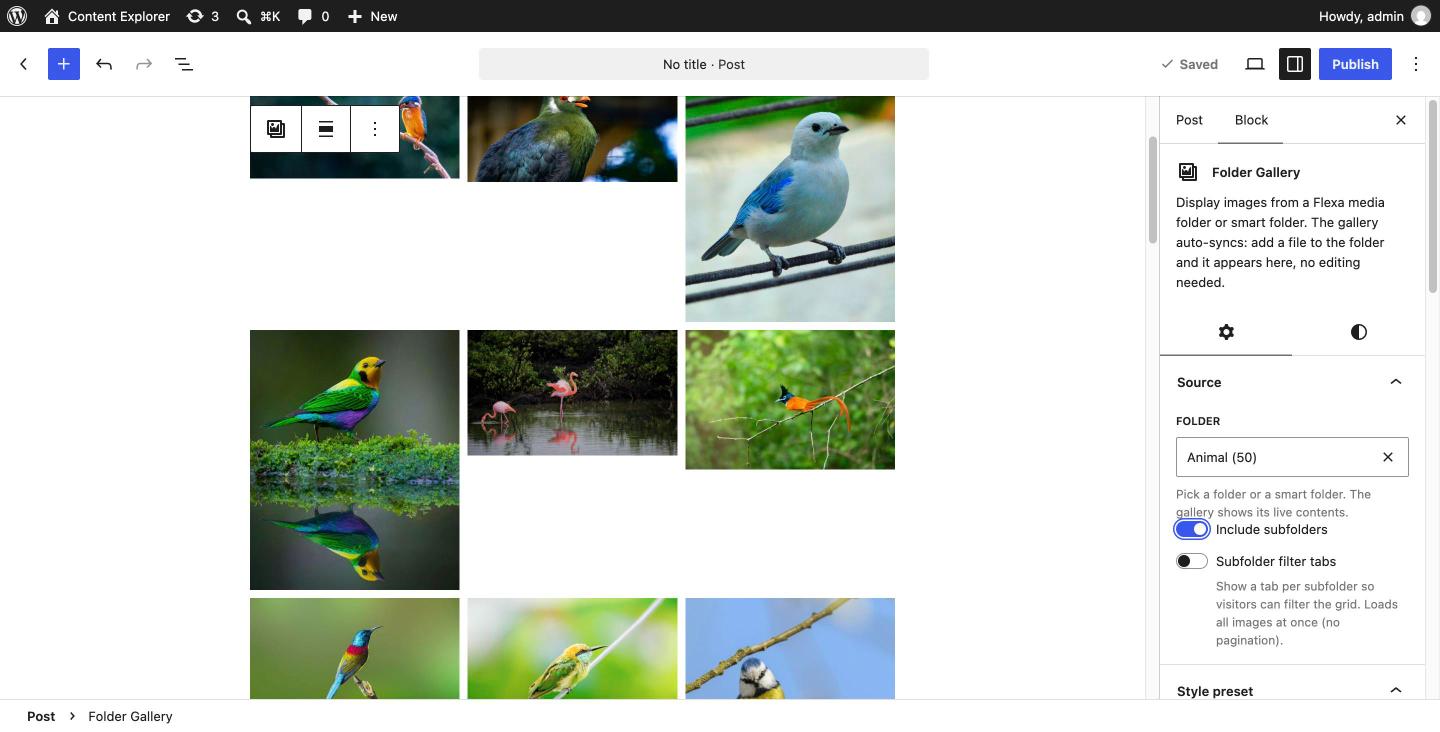
The Folder Gallery block puts a folder’s images on any page or post. Pick a folder once; the block stays in sync - add a file to the folder later and it appears in the gallery automatically, no editing the page. Pro
- In the block editor, click + and search for Folder Gallery.
- In the block’s Source panel, pick a folder (regular, smart, or one used for multi-folder targets) and optionally Include subfolders.
- Tune Layout (Grid / Masonry / Justified, columns, gap), Images (size, caption, order), and Links & lightbox, then publish.
Fast and self-syncing
The block serves correctly sized, responsive, lazy-loaded images (not full-resolution originals), shows a Load more button for large folders, and offers a lightweight built-in lightbox or PhotoSwipe. Point it at a smart folder for a gallery that curates itself.
Pro feature
Folder Posts block
The post-side companion to the gallery. Where Folder Gallery shows a media folder’s images, Folder Posts shows a post, page or product folder’s published items as a grid or list of cards. File a post into the folder later and its card appears on its own, with no need to edit the page again. Pro
Turn on folders for that post type first
The block’s picker only lists post types that have folders enabled, so start at Settings → Integrations → Folders for post types and create a folder or two. See Folders for posts, pages & products.
- In the block editor, click + and search for Folder Posts.
- In the Source panel, pick a folder. The list groups folders under their post-type label (Posts, Pages, Products) and indents them to match your tree. Turn on Include subfolders to pull in nested folders too.
- Choose Grid (1 to 6 columns) or List (image beside text), set the gap, and pick which parts of each card to show.
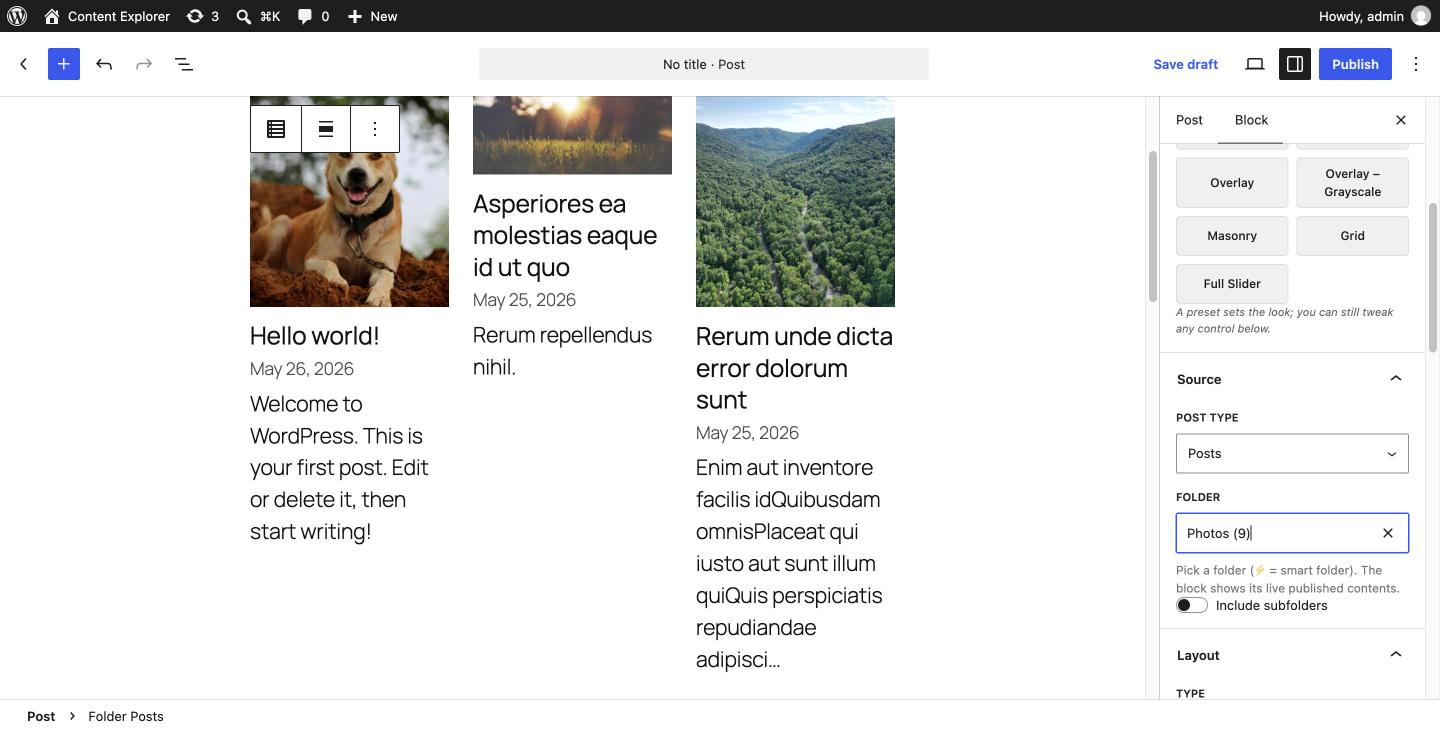
| Card part | Notes |
|---|---|
| Featured image | Responsive and lazy-loaded, at the size you pick. |
| Title | Linked to the post. |
| Date / Author | Each toggleable on its own. |
| Excerpt | With an adjustable word count. |
| Price | WooCommerce products only. |
| Read more | Optional link with your own label. |
Only published items, always current
The block renders published posts only, so a draft sitting in the same folder never leaks onto a public page. Large folders get a Load more button rather than rendering everything at once, and the editor preview is the real front-end output, so what you see is what visitors get.
Pro feature
Document Library block
The Document Library block shows a folder’s files as a tidy front-end list - file-type icon, size, date and a download button per row - and lets visitors browse into subfolders right on the page, with a breadcrumb to climb back up. Ideal for resource hubs, downloads pages and product documentation. Pro
- In the block editor, click + and search for Document Library.
- In the Source panel pick the folder to show, and choose which columns (icon, size, date, download) to display.
- Set the order and the pagination style - numbered pages, a Load more button, or show everything - then publish.
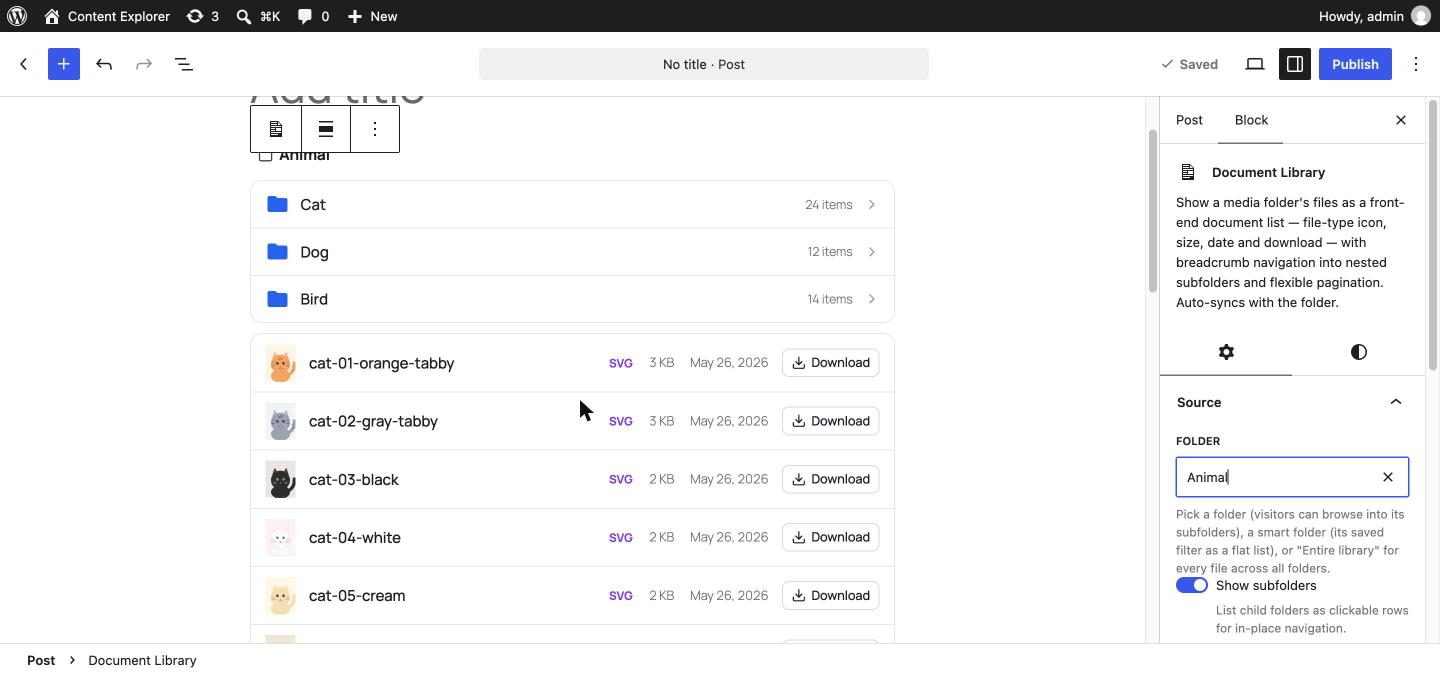
Browse without leaving the page
When Show subfolders is on, child folders appear as clickable rows; opening one swaps the list in place (no reload) and the breadcrumb lets visitors navigate back. Like the other blocks it stays in sync with the folder - add or remove a file and the list updates on the next load.
No block editor? Use the shortcode
On classic-editor posts, in a text widget, or anywhere a page builder accepts shortcodes, drop in the [content_explorer_document_library] shortcode instead. It renders the exact same library as the block. The only required attribute is the folder’s ID (hover a folder in the sidebar - it shows in the tooltip, or read it from the URL when the folder is selected).
[content_explorer_document_library folder="123"]

[content_explorer_document_library folder="123"
    layout="grid" per_page="24" pagination="loadmore"
    orderby="date" order="desc"
subfolders="no" download="no"]| Attribute | Values | Default |
|---|---|---|
folder | Folder ID to show (also accepts id) | required |
layout | list · grid | list |
pagination | numbered · loadmore · none | numbered |
per_page | Files per page (1–200) | 20 |
orderby | title · date · menu_order · id | title |
order | asc · desc | asc |
subfolders, icon, size, date, download | Show that column. Set to no / false / 0 to hide | true |
Pro feature
Folders for posts, pages & products
The same folder tree can organize your other content. Turn it on for Posts, Pages, WooCommerce Products, or any public post type, and that type’s list screen grows a folder sidebar. Pro
- Go to Settings → Integrations and tick the post types you want folders for under Folders for post types.
- Open that type’s list (e.g. Posts → All Posts). A folder sidebar appears; click a folder to filter the list.
- File content by dragging a row onto a folder, or tick rows and use the Move to folder bulk action.
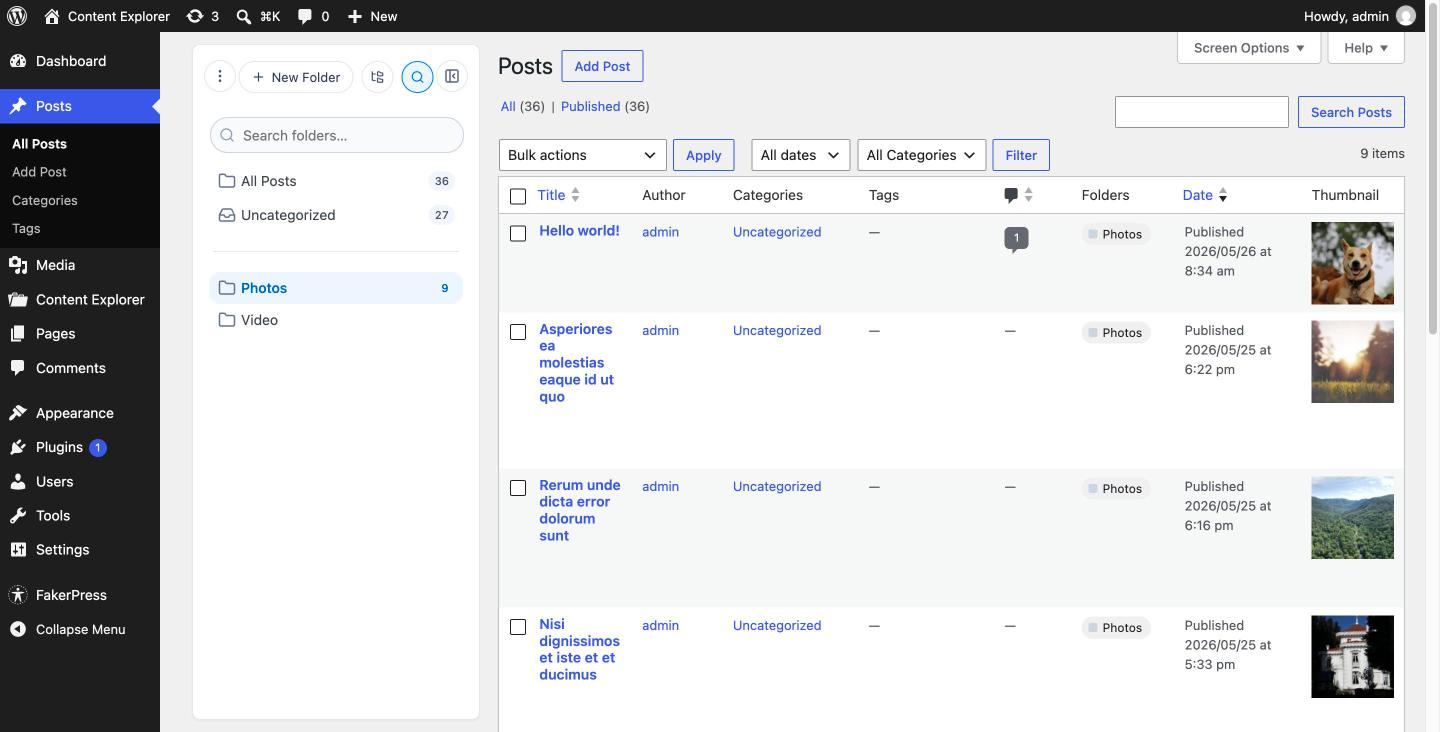
Each post type is its own tree
Posts, Pages, Products and Media each keep a separate folder set - a “Summer sale” Products folder and a “Summer sale” media folder never mix. Content lives in one folder at a time, and you can only file content you have permission to edit.
Pro feature
ACF folder field
If your site uses Advanced Custom Fields, Content Explorer adds a Folder field type so editors can pick one of your folders inside a field group - on a post, page, product, term, or options page. Your template then reads that choice. Pro
- In Custom Fields → Field Groups, add a field and set its type to Folder (Content Explorer) (under Relational).
- Configure Folder type, Return value (Folder ID or Folder object), multiple, and allow null.
- Editors pick a folder wherever the group appears; read it in your template with
get_field().
Show every image in the chosen folder (return value Folder ID):
$folder_id = get_field( 'gallery_folder' );

if ( $folder_id && function_exists( 'content_explorer_get_attachments_in_folder' ) ) {
    foreach ( content_explorer_get_attachments_in_folder( $folder_id ) as $image ) {
        echo wp_get_attachment_image( $image->ID, 'large' );
    }
}
See the template helpers reference for content_explorer_get_attachments_in_folder().
Pro feature
Backups
Hours of filing is worth protecting. The Backups tab takes snapshots of your folder organization, on a schedule or on demand, and can put any of them back. Pro
What a snapshot holds
Every folder and every file-to-folder assignment. Your media files are never copied, so a snapshot is tiny and restoring one only rewrites the tree and its memberships: file URLs and attachment IDs stay exactly as they were.
- Open Settings → Backups. Turn on automatic backups and pick a cadence (every 6, 12 or 24 hours, or weekly). The card shows a countdown to the next run.
- Use Back up now any time you are about to reorganize something big.
- Set Keep last N snapshots (up to 100) and older ones are pruned for you after each new write.
- To go back, pick a row and click Restore. You type
restore snapshotto confirm.
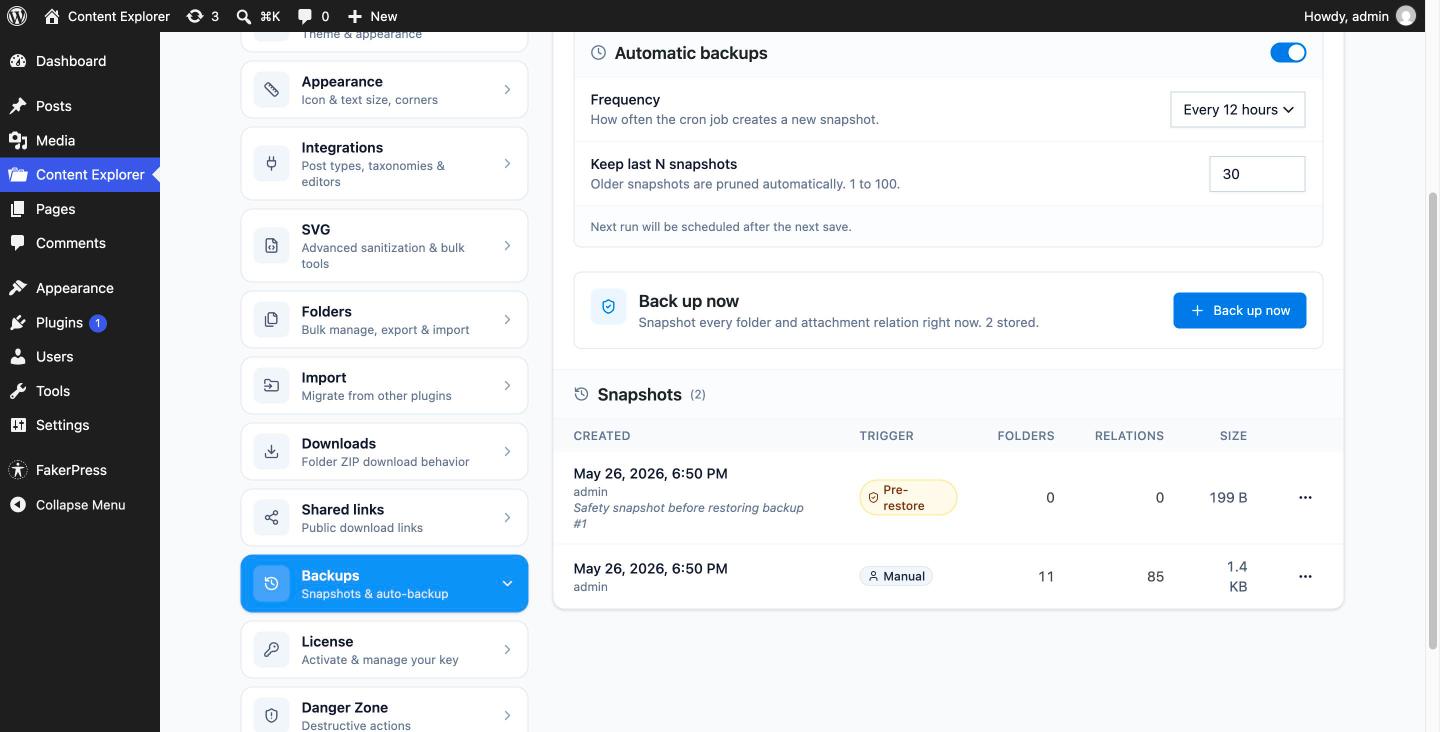
Each row is labelled Auto, Manual or Pre-restore so the history is easy to scan, and Download .json saves a copy off-site.
A restore is itself reversible
Just before any restore runs, the plugin quietly takes a pre-restore snapshot. Restore the wrong one and you can simply restore your way back.
Automatic backups need WP-Cron
The schedule rides on WordPress’s own cron. If your site sets DISABLE_WP_CRON, the tab shows a warning and you will want a real server cron job; manual snapshots keep working either way.
Pro feature
Activating your license
Pro features unlock once this site is activated with the key from your purchase. One key covers a set number of sites, depending on the plan you bought.
- Open Content Explorer → Settings → License.
- Paste your license key and click Activate. The panel then shows the plan, whether it is a yearly or lifetime license, and when it renews.
- Moving the site, or retiring it? Click Deactivate first to free the seat for another site.
Staging, offline, and renewals
- The site re-checks the license roughly every two days. A short network outage changes nothing: Pro keeps working for a grace period, and only a definite answer from the license server (expired, revoked, or the seat is gone) locks the Pro features back down.
- A domain counts as one seat whether you reach it over http or https, with
wwwor without, so you cannot burn two seats on one site by accident. - If a license lapses, nothing is deleted. Your folders and assignments stay exactly as they are and the Pro surfaces go back to showing the upgrade prompt until the key is renewed.
Networks
Multisite networks
On a WordPress multisite network every site gets its own independent folder tree. Folders, smart folders, share links, backups and settings created on one site are invisible on the next, the same way each site has its own posts and media.
- Network-activate the plugin and every existing site is set up in one pass. Any site added later is set up automatically when it is created.
- Or activate per site, and only that site gets a folder tree. The rest of the network stays untouched.
- Settings are per site too, so one site can run Smart Folders while the next has them off.
- Deleting a site cleans up its folder data with it; nothing is left behind.
No network admin screen
Everything lives under each site’s own wp-admin, where the media it organizes lives. Super admins manage folders by visiting the site they want to work on. Upgrading an existing single-site install into a network needs no migration: its folders simply become the main site’s.
Help
Troubleshooting & FAQ
Clicking a folder doesn’t filter the library.
Reload Media → Library in grid view. Folder filtering relies on the grid’s AJAX query; the classic list view (?mode=list) uses a URL-based fallback.
Did deleting a folder delete my images?
No. Deleting a folder only removes the folder; its files move to Uncategorized and stay in your Media Library. The plugin never deletes attachments.
A Pro menu item or settings tab opens an upgrade prompt.
That feature (Smart Folders, Share links, Multiple folders per file, and the rest) needs an active Content Explorer Pro license. The surface is visible in the free version but locked until Pro is active.
Dragging a file moves it - I wanted to add it to a second folder.
Turn on Multiple folders per file (Pro) in Settings → General. With it on, dragging adds instead of moving.
Where is the settings page?
Content Explorer is its own item in the wp-admin sidebar, below Media. The folder sidebar itself lives in Media → Library; the settings screen, with its tabs, is the Content Explorer menu item.
Arrow keys scroll the page instead of moving between folders.
The sidebar needs focus first. Click a folder once, or press Tab until the sidebar is highlighted, and the arrows will move the keyboard cursor from there.
Click-again renaming opened when I didn’t mean it.
It triggers only on a slow, deliberate second click of an already-selected folder, and never on a double-click. If it opens by surprise, press Esc.
I bought Pro but the features are still locked.
Activate the site under Content Explorer → Settings → License, then reload the Media Library. If the key reports no seats left, deactivate it on a site you no longer use to free one up.
Can I move my folder tree to another site?
Yes. Export it from Settings → Folders as JSON (Pro), then import that file on the other site. The export carries the folder structure and colors, not the files themselves, so bring the media across with your usual migration tool.
My SVG won’t upload.
Make sure Allow SVG uploads is on in Settings → General. If it’s on and the file is still rejected, the cleaner couldn’t make it safe - re-export a plain, flat SVG from your design tool and try again.
Need the technical details (REST API, hooks, database schema)? See the technical documentation.
Get Content Explorer Pro
Every section above carrying the amber Pro badge comes from the Pro build. It installs over the free plugin on the same site, keeps the folders you already have, and adds:
- Smart folders that fill themselves from saved rules
- One file in several folders at once, with a folder checklist in the attachment panel
- Folder ZIP downloads and share links with expiry and a password
- The Folder Gallery, Folder Posts and Document Library blocks
- SVG uploads, sanitized on the way in
- Folders for posts, pages and custom post types
- Per-user folders, pinned folders and display themes
- Scheduled backups of the folder tree, plus export and import
Opens flexacommerce.com. Activate the key under Content Explorer → Settings → License.